Making a school project city out of paperboard at home can be a fun and creative process! Here’s a step-by-step guide to help you create your own paperboard city
Materials You’ll Need:
- Paperboard (from cereal boxes, shoe boxes, etc.)
- Scissors
- Glue or tape
- Markers, colored pencils, or paints
- Ruler (for measuring and straight lines)
- Craft knife (optional, for precision cutting)
- Cutting mat (optional but recommended for safety)
- Decorative items (small paper cutouts, stickers, construction paper, etc.)
- Small objects for cars, trees, or people (optional)
Step-by-Step Instructions:
1. Plan Your City Layout
- Before you start cutting, sketch a layout of your city. Decide how many buildings, roads, parks, or other elements you’d like to include.
- Draw the positions of key structures: buildings, houses, roads, and any other features.
- You can even include landmarks like bridges or monuments.
2. Create the Base
- Start by cutting a large piece of paperboard to serve as the base of your city. This can be the size of a box or a flat piece, depending on the space you have.
- If your project is going to be small, a shoe box lid can work perfectly as the base.
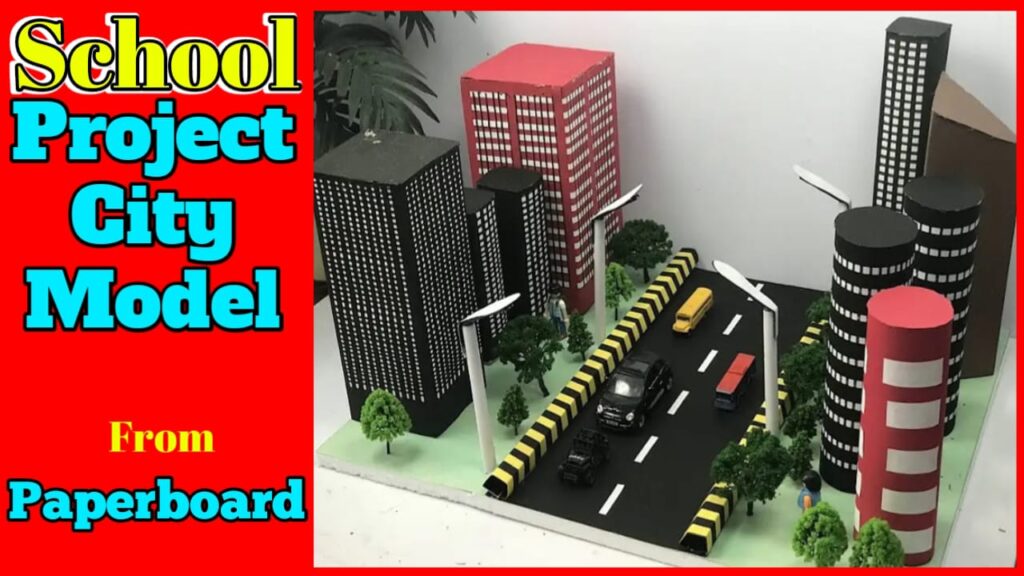
3. Make the Buildings
- Buildings: Cut rectangles or squares from paperboard to form the walls of your buildings. For 3D structures, glue the walls together to make boxes (use a smaller piece for the top to create roofs).
- Decorate each building by coloring or painting them. You can add windows and doors using markers, colored paper, or cut-out shapes. Be creative with different building styles.
- Use small pieces of paperboard to create smaller details like antennas, balconies, or signs on the buildings.
4. Create Roads and Streets
- Cut strips of paperboard to form the roads. You can paint or color them gray and add white lines for lanes.
- Lay the roads across the base in your planned layout, using glue or tape to secure them.
5. Add Other Structures
- You can create parks, playgrounds, or trees by cutting shapes from green paper or colored paperboard.
- Use small bits of paper to create benches, signs, or even cars.
- If you have tiny toy figures or vehicles, you can incorporate those into your city.
Make School Project City From Paperboard at home.
6. Assemble the City
- Start gluing the buildings onto the base. Arrange them in a way that makes the city look realistic or according to your design.
- Add the roads, parks, and any other features you want to include. You can glue down trees, benches, or any other objects for added realism.
7. Decorate and Add Final Touches
- You can add more decorative details like flags, streetlights (made from small paper tubes), or signs. Use colored markers to add details like road names or numbers.
- If you want to create windows and doors that pop, you can use craft foam or additional layers of paperboard.
9. Finish Up
- Once everything is dry and securely in place, carefully check for any rough edges or pieces that need to be adjusted.
- You can also use a little bit of glitter or shiny paper to give your city some sparkle, or maybe some cotton balls to represent clouds or smoke from factories.
Tips:
- Be patient and let each layer dry completely before adding more elements.
- Use recycled materials for an eco-friendly project.
- Consider labeling your city (e.g., naming streets or buildings) for a more polished look.
With these steps, you can create a fun and impressive city model for your school project. Have fun building
Thank You visit my website creativitytopper