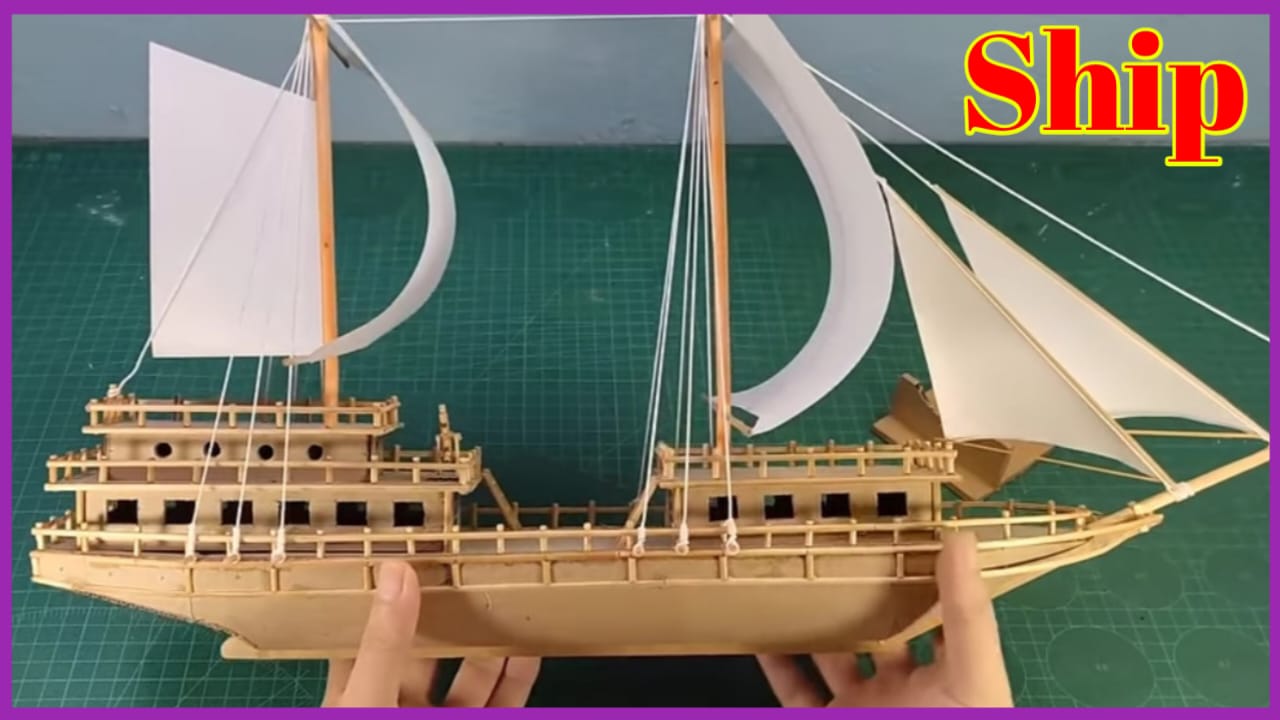
Creating a mini ship project from ice cream sticks is a fun and creative craft activity. Here’s a step-by-step guide to help you build your own miniature ship:

Materials Needed for Mini Ship Project
- Ice cream sticks (popsicle sticks)
- Hot glue gun or craft glue
- Scissors or a small saw
- Ruler
- Pencil
- Sandpaper (optional, for smoothing edges)
- Paint and brushes (optional, for decoration)
- Small piece of cloth or paper (for the sail)
- String or thread (for the mast)
- Cardboard or thin wood (for the base, optional)
Step-by-Step Instructions:
1. Prepare the Base of the Ship
- Lay down 5-7 ice cream sticks side by side to form the base of the ship.
- Glue two sticks horizontally across the bottom to hold them together. These will act as the support beams.
- Let the glue dry completely.
2. Build the Sides of the Ship
- Take two ice cream sticks and bend them slightly by soaking them in warm water for a few minutes (this makes them flexible).
- Glue the bent sticks vertically along the edges of the base to form the sides of the ship. Hold them in place until the glue dries.
3. Create the Deck
- Cut ice cream sticks to fit the length of the base and glue them horizontally across the top to form the deck.
- Leave some space at the front and back for the bow and stern.
Make Mini Ship Project From Ice Cream Sticks
4. Shape the Bow and Stern
- For the bow (front of the ship), cut a small piece of an ice cream stick and glue it at an angle to create a pointed shape.
- For the stern (back of the ship), you can leave it flat or add a small vertical stick for detail.
5. Build the Mast
- Cut a longer ice cream stick or use a wooden skewer for the mast.
- Glue the mast vertically in the center of the deck. Make sure it’s secure.
6. Add the Sail
- Cut a small piece of cloth or paper into a rectangular or triangular shape for the sail.
- Punch two small holes at the top and bottom of the sail.
- Thread a piece of string or thread through the holes and tie it to the mast.
7. Add Details
- Use smaller pieces of ice cream sticks to create railings, ladders, or other decorative elements.
- You can also paint the ship in your desired colors or add designs like portholes or flags.
8. Optional: Create a Stand
- If you want your ship to stand upright, glue it to a small piece of cardboard or thin wood as a base.
Tips:
- Be patient with the glue and allow each part to dry before moving on to the next step.
- Use sandpaper to smooth any rough edges for a polished look.
- Get creative with your design—add more masts, sails, or even tiny figures to personalize your ship.
Thank you very much visiting my website Get more Content http://Click Here