Making a DIY automatic baby doll is an enjoyable project that requires some creativity and basic materials. It’s a perfect project for parents or anyone who wants to gift a unique toy to a child. In this article, we will guide you through the process of creating an automatic baby doll using cardboard and a few other supplies.
Automatic Baby Dolna Making Video Tutorial
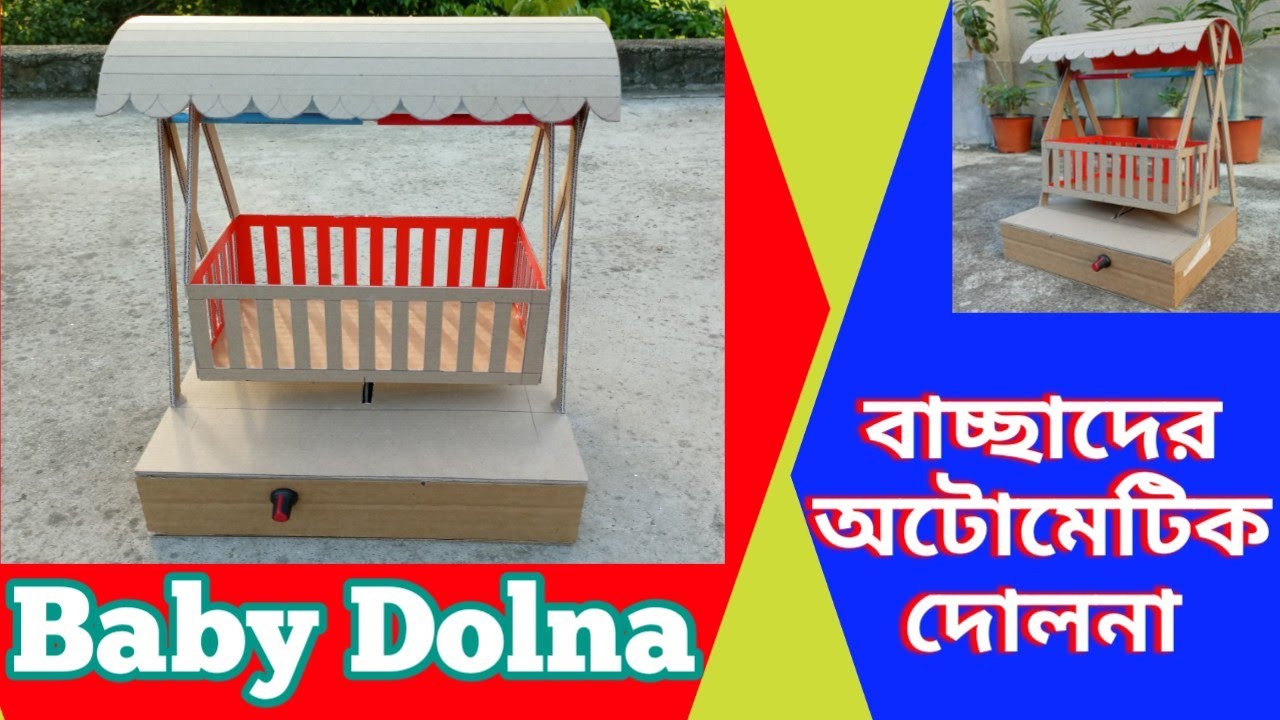
Here Are the steps To Make DIY Automatic Baby Dolna By cardboard.
Materials Required:
- Cardboard
- Pencil
- Ruler
- Scissors
- Glue
- 9v battery
- Small motor
- Electrical wires
- Switch
- Plastic straw
- Rubber bands
- Hot glue gun
Instructions:
- Begin by drawing the outline of the baby doll on the cardboard using a pencil and ruler. You can use a pre-made template or draw the design freehand. Draw the arms and legs separately.
- Once you have the doll’s outline, cut it out using scissors. Do this for the arms and legs too.
- Cut out two small holes for the motor and switch on the back of the baby doll. Make sure they are aligned with each other and the motor can be inserted easily.
- Attach the small motor to the back of the baby doll using hot glue. The motor’s shaft should be pointing outwards through the hole you cut earlier.
- Now, connect the motor to the 9v battery using electrical wires. Make sure to connect the wires correctly. If unsure, consult a wiring diagram or an expert.
- Attach the switch to the other hole on the back of the baby doll. You can use hot glue or duct tape to keep it in place.
- Attach the plastic straw to the motor’s shaft using a rubber band. The straw should extend outwards from the back of the baby doll.
- Cut out small pieces of cardboard to create joints for the doll’s arms and legs. Use hot glue to attach them to the body and limbs.
- Now, connect the arms and legs to the body using rubber bands. This will allow them to move freely.
- Finally, test the automatic baby doll by turning on the switch. The motor should start spinning, and the straw should move back and forth, making the baby doll move its arms and legs.
Conclusion:
Make DIY Automatic Baby Dolna By cardboard
Your DIY automatic baby dolna by cardboard is now complete! To use it, simply place your baby on the dolna and gently rock it back and forth. The motion should help your baby relax and fall asleep.
Remember to always supervise your baby while they are using the dolna, and to make sure that it is securely positioned on a stable surface. With a little bit of creativity and some basic materials, you can create a soothing and comforting space for your baby to rest and play in.
Making an automatic baby doll using cardboard is a fun and easy project that anyone can do. It’s a great way to explore your creativity and build something unique for your child or as a gift for someone else. With the right tools and materials, you can create a beautiful and functional toy that will bring joy to anyone who plays with it. So go ahead, give it a try, and see what you can create
Thank you Very much Visiting for website http://creativitytopper.com
- How To Make DIY Mini bus Project From Cardboard at home. - May 8, 2024
- How To Make Humidifier Spray Module / Mist Maker Project . - April 27, 2024
- How To Make a New Model Subwoofer Box Project by Cardboard - April 15, 2024