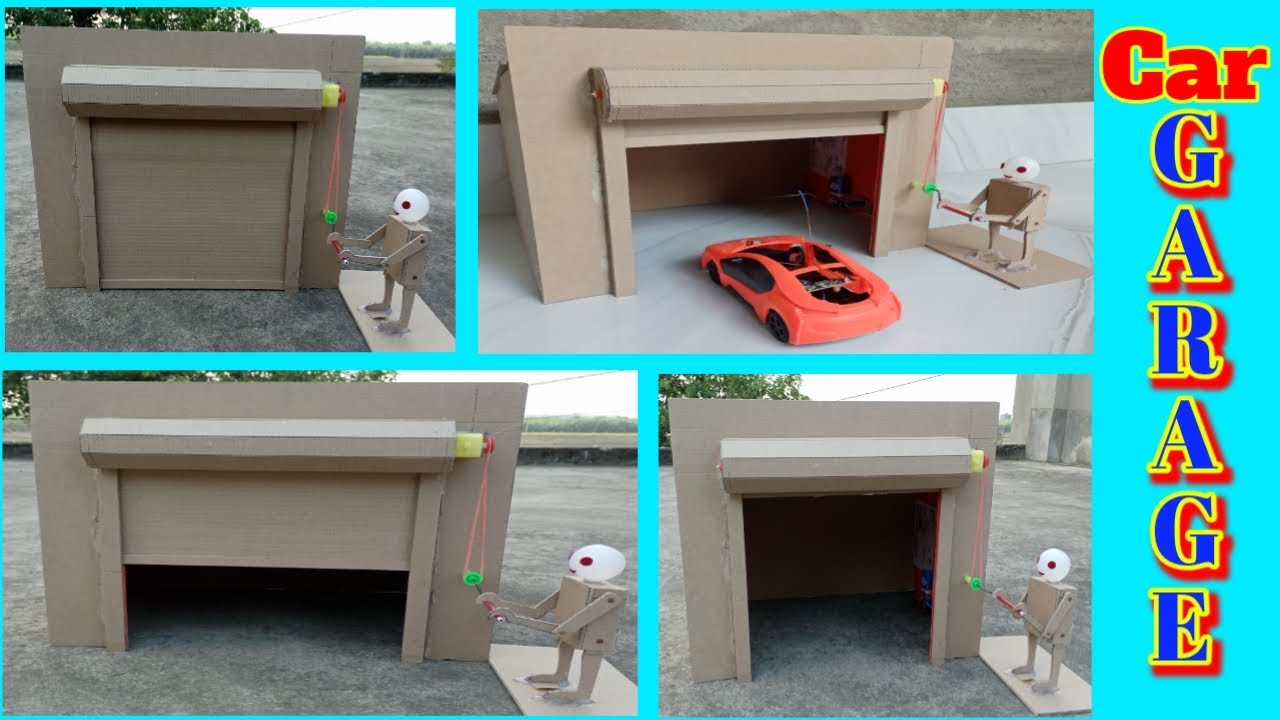
Creating a shutter opening and closing robot for a car garage using cardboard can be a fun and challenging DIY project. With some creativity, innovation, and basic electronics knowledge, you can make your own functioning robot to automate your garage shutter. In this article, we will walk you through the process of making a shutter opening and closing robot using cardboard.
Make Shutter Up & Down In Garage
Materials Required:
- Cardboard
- DC motor
- Motor driver
- Battery pack
- Jumper wires
- Switch
- Glue
- Cutter
- Soldering Iron
- Screws
Step 1: Designing the Robot To begin with, you need to design your robot on paper to understand its dimensions and structure. Use cardboard to make the base and the shutter. You can cut the cardboard in the desired shape and size using a cutter.
Step 2: Mounting the Motor Now, you need to mount the DC motor on the cardboard base. You can do this by making a hole in the cardboard and fitting the motor into it. Use screws to fix the motor firmly in place.
Step 3: Motor Driver Connection Next, you need to connect the motor driver to the motor. The motor driver will provide the necessary power to the motor for its operation. You can connect the motor driver to the motor using jumper wires. Follow the wiring diagram of the motor driver for proper connection.
Step 4: Power Supply Connection After connecting the motor driver, you need to connect the power supply. Use a battery pack to power the motor driver and motor. You can connect the battery pack to the motor driver using jumper wires.
Make Shutter Up & Down In Garage With Robot
Step 5: Installing the Switch Now, you need to install a switch to control the opening and closing of the shutter. You can use a toggle switch for this purpose. Fix the switch on the cardboard base and connect it to the motor driver using jumper wires.
Step 6: Shutter Installation After completing the robot, you need to install the shutter on it. You can use cardboard to make the shutter. Cut the cardboard in the desired shape and size and fix it on the motor. Use glue to fix the shutter firmly in place.
Step 7: Testing Once you have completed the robot, you need to test it. Turn on the power supply and use the switch to open and close the shutter. If the shutter opens and closes smoothly, then your robot is ready for use.
Conclusion:
In conclusion, creating a shutter opening and closing robot using cardboard can be a fun and exciting DIY project. With basic electronics knowledge, you can make your own functioning robot that can automate your garage shutter. By following the above steps, you can create your own robot and impress your friends and family with your creativity and innovation.
Thank you very much Visiting For website:-http://creativitytopper.com
- How To Make DIY Mini bus Project From Cardboard at home. - May 8, 2024
- How To Make Humidifier Spray Module / Mist Maker Project . - April 27, 2024
- How To Make a New Model Subwoofer Box Project by Cardboard - April 15, 2024